Homebrewing can be as simple or as difficult as you want to make it. I’m a bit of a perfectionist myself, and when I realized I could be making tons of mistakes fermenting my Belgian Tripel, I began to panic.
Follow these steps and maybe I can save you from drinking nail polish.
The optimal fermentation temperature for a Belgian Tripel depends on the yeast you are using. The most common fermentation temperature for a Belgian Tripel is 68-72 degrees Fahrenheit. The fermentation schedule of a Belgian Tripel is between 2-3 weeks before bottling.
While the above is a fairly standard answer to brewing a Belgian Tripel, there are many ways you could be making mistakes without realizing it.
You might think you are in the correct temperature range when in reality you blew right past it.
1. Fermentation Temperature Failure
Belgian Tripels like most ales need to be fermented at around room temperature. However, depending on your yeast strains you could be getting different flavor profiles at lower or higher fermentation temperatures.
Yeast Produces Heat
So you might be thinking, its fine, I have a temperature controlled chest fridge.
You may think you are fermenting at 69F when in reality it’s likely hitting somewhere closer to 76F. This is because as yeast eats up the sugars it is producing heat and increasing the temperature.
If you are using a glass carboy, you may be even making a bigger mistake since glass is an excellent insulator. Plastic Buckets may be a better option for better temperature control, since the cool air can reach the wort better.
Yeast Produces Different Flavor at Different Temperatures
This goes for yeast producers as well. For example White Labs produces yeast that generates desirable flavors at lower temperatures than Wyeast does.
Creating a Belgian, with White Labs, at temperatures that reach 80 degrees Fahrenheit, you will get more phenols or off flavors than you would with Wyeast.
The reason for this is not because Wyeast has yeast that performs better at those temperatures, but rather Wyeast strains have other flavors that help to combat those undesirable phenols.
| Lab | Yeast Name | Flavor at 75-85F |
|---|---|---|
| White Labs | WLP 530 | Spicy, Phenolic, Solvent |
| Wyeast | 3787 | Bubblegum, Clove, Alcohol, Fruity, Tart, Lt.Solvent |
White Labs exhibits, phenolic and solvent flavors at these high temperatures, which are two flavors that are very fusel (nail polish) in nature.
Wyeast may be a better choice if you don’t have any temperature control.
Some of the better flavors of fruit and clove along with spiciness, are often achieved at higher temperatures, but you need to make sure everything is well within balance.
2. Your Mash Temperature was too Low
There are a ton of variables at work here, depending on what you want out of your Belgian Tripel. When you mash at lower temperatures you are creating a more digestible sugar for the yeast. This will lead to a dryer beer.
This can pose problems if you also make the mistake of fermenting at higher temperatures with a yeast that produces off flavors at those types of temperatures.
What I mean by this is you are adding super digestible sugars and then supercharging the yeast. This will lead to a massive spike in yeast activity in the early days of fermentation.
If you don’t have the right yeast to handle this type of spike in activity at high temperatures then it could lead to more fusel alcohol taste.
Refer to the Wyeast and White Labs Chart in #1.
3. Not Paying Attention to Your Yeast
You could be like me, on my first time brewing. Well looks like the most common type of yeast is this one, for this particular beer!
Good lord I was naive, there is a variety of yeast types that create different flavor profiles.
These flavors also only materialize at specific temperatures. So if for example you read that a particular yeast has a lovely cherry flavor, then you need to look at the specific temperature that flavor begins to show itself.
If you ferment a belgian beer to cold, for example 160F then it will be a much more clean taste and not get that specific cherry flavor you desire.
It’s always better to start with a clean taste at lower temperatures and then gradually raise the temperature to achieve the fruitier flavors.
4. Fermenting and Bottling too Quickly
Remember how I said some yeast can create fusel alcohol flavor? Well this could be rectified and mellow out over time.
So make sure if you made the mistake of not fermenting your yeast at the proper temperature to rectify it by allowing it to mellow a bit longer in fermentation.
This is why I recommend having it ferment for nearly three weeks in primary.
The extra time will allow any off flavors to mellow out.
Not to mention bottle conditioning could take a considerable amount of time longer.
You may be able to try the beer out after 2-3 weeks, but if the flavor is not to your liking you can try it again after 4 month’s and you may be pleasantly surprising. Just make sure not to cold crash it right away.
5. Adding too Many Specialty Grains
I’m talking about adding an array of crystal malt, caramel malt, roasted malt and even tossing in random adjuncts.
If you get too many of these malts together there is no telling how it will react to any specific yeast. You could end up with a completely unknown flavor, that likely will not taste great.
You might be thinking all in the name of experimentation right? Well, wrong.
If your interested in more detail as to why check out my Belgian recipe crafting article.
I’m not saying you won’t stumble onto a delicious brew, but I am saying that, before you know what flavor each grain can individually produce from said yeast, you are wasting your money.
Slow implementation of specialty grains, is a better way to explore what a specific grain does while at the same time keeping you from spending tons of money on a flavor that is entirely unknown.
6. Unnecessary Secondary Fermentation
Most Belgian beers will not need a secondary fermentation. Unless of course you are brewing a wheat beer and adding fruit to secondary.
But if you are brewing a dubbel or a tripel then it is entirely unnecessary.
You are exposing the beer to oxygen with the goal of clearing up trub that is nearly nonexistent in the first place.
Belgian beer is famously bottle conditioned.
So its best to just transfer straight from primary to a bottle, or if you want a keg.
7. Not Fermenting at Colder Temperatures and Slowly Raising it
Because much of the sugars in a Belgian Tripel are super digestible to yeast, it can finish really quickly. A way to combat the fast fermentation and avoid unwanted flavors is to start the fermentation at a lower temperature.

A temperature range of 63-64F is common to start Belgian beers after a few days you can then raise the temperature to the normal 70-72F range. This will create a more balanced beer with a rounded flavor profile.
Starting at lower temperatures will also ensure your beer has a clean taste with less phenols. Then letting it rise in temperature you can add those fruity notes to the beer profile to coincide with the clean taste.
8. Using Dry Yeast instead of Liquid Yeast
Liquid yeast creates a higher purity and greater ester profile in beer. If you are using dry yeast it could result in higher levels of fusel alcohols.
Since Belgian Tripels have a lot of issues with fusel alcohols its better to err on the side of caution and use liquid yeast. Dry yeast could be better utilized if you are making a starter kit before dumping into your wort.
9. Not Oxygenating Your Wort Enough Prior to Fermentation
Oxidation is terrible for hops and bad for beer in general, but its also good when its dissolved in wort. But why?
Oxidation in particular is terrible for beer, so at the end of the day you want as little as possible left in the beer. The problem is yeast needs oxygen in the wort to be healthy and produce that delicious beer.
Wort will need to have oxygen added to it since the boil stripped all of it.
This can be done in a few ways.
- Shaking the wort once in your fermentation carboy or bucket. This gets all the available oxygen in the head-space into the wort.
- Using an aeration system to pump oxygen into the wort.
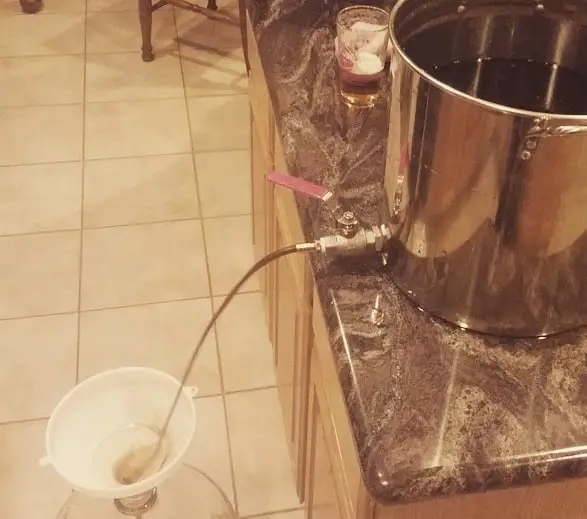
- Now this may seem silly but I learned it from a gardening channel. You essentially oxygenate wort by letting it pass through air on its way into the fermentation bucket. The higher the stream is from the bucket or carboy for fermentation the more the wort gets oxygenated.
So the last one you might be skeptical of but, have you ever noticed that weeds grow like crazy and leaves are greener?
Well that’s because the rain is falling from high in the clouds picking up tons of oxygen to feed to plant life below. Oxygen that plants crave.
While this might be a good enough way to ensure your wort does indeed contain oxygen, it does not make up for knowing exactly how much oxygen is in your wort. I would also recommend you still shake the carboy.

10. Cold Crashing
You might think to clarify you beer by cold crashing it. This may even save some money since you won’t need a whirlfloc tablet. However it could cost you.
If you cold crash your Belgian beer and bottle it before bringing it back to room temperature you may as well not even make a Belgian.
The whole point of a Belgian beer is to bottle condition and have a delicious foamy mess. This means you will want to have a good amount of yeast and sugar left in the bottle.
Cold crashing could jeopardize the yeast left in suspension. This is especially true for yeast with high floculation, you could end up with very little yeast in the bottle creating a poor quality Belgian experience.
